Recently, I was asked to give a talk on PowerPoint 2016. It’s what our staff uses, or at least what they have on their computers. In order to get up to date on the program I did some courses on LinkedIn Learning (formerly Lynda.com). I was blown away by some of the options available that I would never have noticed otherwise. Here are a few of my favorites:
- Background removal tool. If you have an image and want to remove the background so the image looks better or fits the rest of the slide without taking up too much space, you can now do so within PowerPoint. Here’s how:
- Insert picture in file
- Click on the picture
- Click format
- Click Remove Background
- You will see the image is covered in pink. If you look to the left at the slide sorter you will notice the image background has been removed. There may be some left or some missing.
- Move the box edges (white circles) as close to the parts of the image as you wish to keep. Note the image in the slide sorter will change as well.
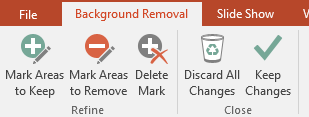 Next, click on the Mark Areas to Keep button. Click on area you wish to keep and drag the pencil to the end of the area. Keep a straight line if possible. More of the image will show. Keep adjusting till you get everything you want.
- Then, click on the Mark Areas to Remove button. Do the same as with the + button.
- When you have it looking the way you want, Click on the Keep Changes button. You can always try again if it’s not exactly what you want.
- Eyedropper tool. If you are a Photoshop user, you’ve probably used the eyedropper tool to use a color that is in your image for another purpose (text, background, etc.). Now PowerPoint lets you do the same. I am going to add an image as the background and then add text and change the text to use colors within my background image. Here’s how:
- Insert photo as your background – this will make sure the image fills the background without needing to manipulate and it also will stay in place. (Hint: if you plan to make the slide into a poster or want a wide screen option, click on Design > Slide Size and choose the size you want).
- Design
- Format background
- Picture/texture fill
- Fill from file (choose an image from your computer or look online using Bing).
- Insert text box
- Add text
- Make it larger
- Choose a Font – it should be easy to read but also stand out.
- Move text box to where you want to place it (you can move it after you change it) to get it exactly as you wish.
- Change the text color – by paragraph or word by highlighting the text you want to change.
- Click on Color (down arrow for eyedropper tool)
- Hover mouse over sections of your image to see what the color will look like. When you find one you like click and the text will change.
- Repeat until you get the text color that you want. Here’s what I created:
- Insert photo as your background – this will make sure the image fills the background without needing to manipulate and it also will stay in place. (Hint: if you plan to make the slide into a poster or want a wide screen option, click on Design > Slide Size and choose the size you want).

Give both a try and see what you think. I’ll add more PowerPoint tips soon. Faye

Faye, great post in Teaching with Technology this week. Good to see you doing this.
Beth
From the Desk of Elizabeth K. Reed Teaching & Learning Consultant (802) 299-8293 “None of us is as smart as all of us” – Kenneth H. Blanchard
LikeLike
Thank you Beth. Working my way back. Faye
LikeLike